Hướng dẫn tạo banner Google+ kết hợp thống kê Blog đầu trang
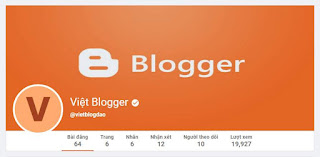
Nếu các bạn sử dụng các trang mạng xã hội các trang cá nhân đều có banner đầu trang trong đó có ảnh banner, ảnh đại diện tài khoản và bên dưới là những con số thống kê. Tất cả các trang web đều sử dụng phương pháp GET từ thiết lập tài khoản của người dùng.
Trong bài viết hôm này mình hướng dẫn các bạn thiết kế banner Google+ kết hợp thống kê Blog đầu trang sử dụng trong mẫu template áp dụng cho nhiều Blog khác nhau khi người dùng thiết lập đầu vào chỉ cần id của Google+.
Bài viết mình chia làm 3 phần:
- Tạo widget
- Chỉnh sửa tiện ích và viết script
- Viết css
Phần 1: Tạo widget tiện ích
Thêm 1 thẻ tag b:section đầu trang để thêm widget, thẻ tag này nằm trên thẻ tag b:section của widget Blog1
<b:section cond='data:view.isHomepage' id='banner' name='Banner' showaddelement='true'></b:section>
Với cond='data:view.isHomepage' đặt điều kiện chỉ hiện thị tại trang chủ bạn có thể thay bằng cond='data:view.isMultipleItems' nếu muốn banner xuất hiện ở tất cả các trang index
Khi thêm xong lưu mẫu lại truy cập Bố cục tiện ích tại section mà bạn vừa thêm chọn thêm 2 tiện ích HTML/Javascript và tiện ích Thống kê Blog
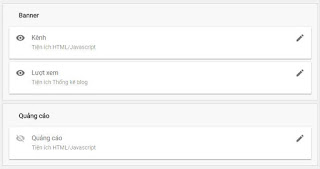
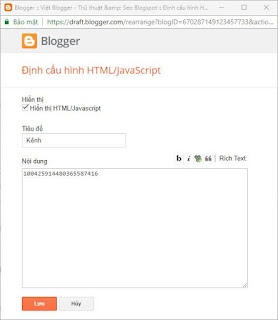
Với tiện ích HTML/Javascript bạn thiết lập đầu vào là id Google+ của một tài khoản Google Plus của bạn hay bất kỳ tài khoản Google Plus nào.
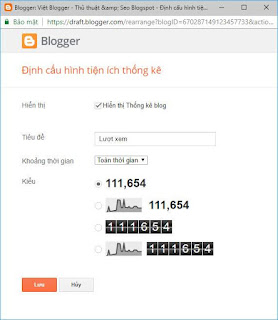
Còn với tiện ích Thống kê Blog bạn thiết lập như hình bên dưới
Khi cấu hình tiện ích xong truy cập lại mẫu chỉnh sửa HTML chọn đến tiện ích HTML/Javascript bạn sửa lại như sau:
Trong thẻ tag <b:includable id='main'> của tiện ích HTML/Javascript bạn sửa lại thành:
<b:includable id='main'>

   <div class='ProfileCanopy-inner'>

      <div class='ProfileCanopy-headerBg'>

         <img class='cover_Photo'/>

      </div>

      <div class='AppContainer'>

         <div class='ProfileCanopy-avatar'>

            <div class='ProfileAvatar'>

               <img class='ProfileAvatarEditing-image'/>

            </div>

         </div>

         <div class='ProfileCardMini-details'>

            <div class='ProfileNameTruncated'>

               <a class='profile_url' target='_blank'>

               <span class='display_Name'/>

               </a>

               <svg viewbox='0 0 48 48' xmlns='http://www.w3.org/2000/svg'>

                  <path d='M24 4C12.95 4 4 12.95 4 24c0 11.04 8.95 20 20 20 11.04 0 20-8.96 20-20 0-11.05-8.96-20-20-20zm-4 30L10 24l2.83-2.83L20 28.34l15.17-15.17L38 16 20 34z'/>

               </svg>

            </div>

            <div class='ProfileCardMini-screenname'>

               <span class='tag_line'/>

            </div>

         </div>

      </div>

   </div>

   <div class='ProfileNav'>

      <ul>

         <li>

            <span class='ProfileNav-label'>

               <data:messages.posts/>

            </span>

            <span class='ProfileNav-value total_posts'/>

         </li>

         <li>

            <span class='ProfileNav-label'>Trang</span>

            <span class='ProfileNav-value total_pages'/>

         </li>

         <li>

            <span class='ProfileNav-label'>

               <data:messages.labels/>

            </span>

            <span class='ProfileNav-value total_labels'/>

         </li>

         <li>

            <span class='ProfileNav-label'>

               <data:messages.comments/>

            </span>

            <span class='ProfileNav-value total_comments'/>

         </li>

         <li>

            <span class='ProfileNav-label'>Người theo dõi</span>

            <span class='ProfileNav-value gplus-count'/>

         </li>

         <li>

            <span class='ProfileNav-label'>Lượt xem</span>

            <span class='ProfileNav-value' id='Stats1_totalCount'/>

         </li>

      </ul>

   </div>

<script>

    var profileId = '<data:content/>';

    var key = 'AIzaSyCd7NXRblaJiHEhj8TXzRmZxr3gkpNCBZ8'; // API key

    var getprofileId = 'https://www.googleapis.com/plus/v1/people/' + profileId + '?key=' + key;

    $.ajax({

      url: getprofileId,

      type: 'get',

      dataType: 'json',

      success: function(data) {

        var displayName = data.displayName; // tên tài khoản

        var url = data.url; // địa chỉ tài khoản

        var tagline = data.tagline; // bí danh

        var image = data.image.url.replace('?sz=50', ''); // link ảnh

        var coverPhoto = data.cover.coverPhoto.url; // link banner

        var gpluscount = data.circledByCount; // số lượt theo dõi

        $('.display_Name,.author_name').html(displayName); // hiển thị tên tài khoản

        $('.tag_line').html(tagline); //  hiển thị bí danh

        $('.gplus-count').html(gpluscount); //  hiển thị số lượt theo dõi

        $('.cover_Photo').attr('src', (coverPhoto)).attr('alt', (displayName)); // hiển thị ảnh banner

        $('.ProfileAvatarEditing-image').attr('src', (image)).attr('alt', (displayName)); // hiển thị ảnh tài khoản

        $('.profile_url').attr('href', (url)).attr('title', (displayName)); // add link vào tên tài khoản

      }

    });

</script>

<script>

  //<![CDATA[

 $.ajax({

   url: "/feeds/posts/default?alt=json-in-script",

   type: "get",

   dataType: "jsonp",

   success: function(data) {

     var totalItems = data.feed.openSearch$totalResults.$t; // tổng số bài đăng

     var total_labels = data.feed.category.length; // tồng số Nhãn

     $('.total_posts').html(totalItems); // hiển thị tổng số bài đăng

     $('.total_labels').html(total_labels); // hiển thị tồng số Nhãn

   }

 });

 $.ajax({

   url: '/feeds/pages/default?alt=json-in-script',

   type: 'get',

   dataType: 'jsonp',

   success: function(data) {

     var total_pages = data.feed.openSearch$totalResults.$t; // tồng số trang tĩnh

     $('.total_pages').html(total_pages); // hiển thị tồng số trang tĩnh

   }

 });

 $.ajax({

   url: '/feeds/comments/default?alt=json-in-script',

   type: 'get',

   dataType: 'jsonp',

   success: function(data) {

     var total_comments = data.feed.openSearch$totalResults.$t; // tổng số nhận xét

     $('.total_comments').html(total_comments); // hiển thị tổng số nhận xét

   }

 });

  //]]>

</script>

</b:includable>
Mình giới thiệu qua một chút về cách get Google+ sử dụng API key, phần tạo key các bạn xem bài viết Hướng dẫn thiết kế Blog YouTube video sử dụng API key phần thiết lập API key và làm tương tự duy chỉ có phần bạn phải kích hoạt thư viện Goolge+ API
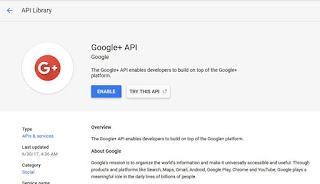
Còn key bạn có thể sử dụng chung cho tất cả thư viện và sử dụng chung cho các Blog với các tài khoản khác nhau. Nếu bạn lười bạn có thể sử dụng key AIzaSyCd7NXRblaJiHEhj8TXzRmZxr3gkpNCBZ8 của mình nhưng mình không đảm bảo vì mình có thể xóa key bất cứ lúc nào do vậy tốt nhất bạn nên tạo và quản lý key sẽ tốt hơn.
Cách get Google+ API sử dụng link mẫu
https://www.googleapis.com/plus/v1/people/100425914480365587416?key=AIzaSyCd7NXRblaJiHEhj8TXzRmZxr3gkpNCBZ8
Với 100425914480365587416 là id của tài khoản Google+ và AIzaSyCd7NXRblaJiHEhj8TXzRmZxr3gkpNCBZ8 là API key
Khi mở link get ở trên bạn sẽ thấy được thông tin như hình dưới đây
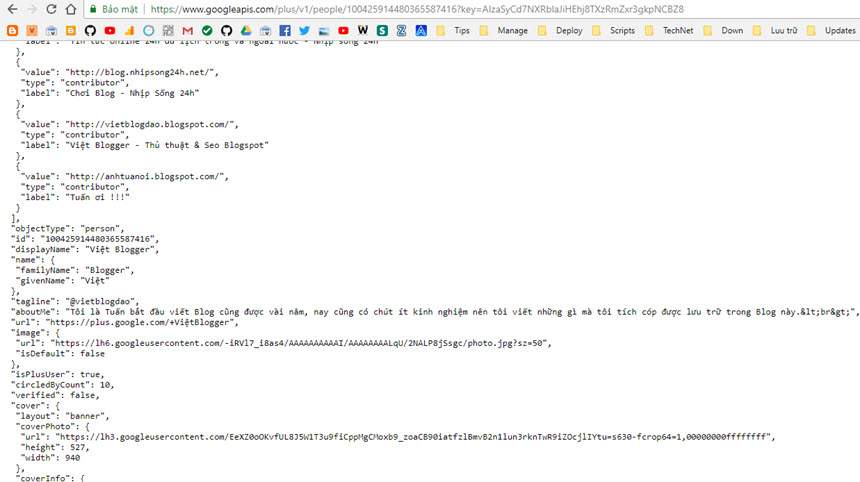
Trong có các thông tin về tên tài khoản (displayName), Biệt danh (tagline), địa chỉ tài khoản (url), link ảnh tài khoản (image), số lượt theo dõi (circledByCount), link ảnh banner (coverPhoto),...Kết hợp với script get ở trên cho ra được một con số cụ thể.
Phần 3: Viết css
Mẫu css tham khảo chèn trong <b:skin>
#Stats1 {

    display: none !important;

}

#banner {

    max-width: 860px;

    margin: auto;

    margin-bottom: 15px;

}

.ProfileCanopy-inner {

    position: relative;

    width: 100%;

}

.AppContainer {

    height: 100%;

    position: relative;

}

.ProfileCanopy-headerBg {

    height: 350px;

    background: #fff;

}

.ProfileCanopy-inner img {

    width: 100%;

    height: 100%;

}

.ProfileCanopy-avatar {

    bottom: -10px;

    left: 20px;

    position: absolute;

    transition: bottom .3s;

    z-index: 3;

}

.ProfileAvatar {

    background: #fff;

    border: 5px solid #fff;

    border-radius: 50%;

    height: 140px;

    position: relative;

    width: 140px;

}

.ProfileCanopy-avatar img {

    transition: box-shadow .15s ease-in-out;

    border-radius: 50%;

    height: 100%;

    left: 0;

    position: absolute;

    top: 0;

    width: 100%;

}

.ProfileCardMini-details {

    position: absolute;

    left: 180px;

    bottom: 30px;

    line-height: 30px;

    color: #fff;

}

.ProfileCardMini-details .ProfileNameTruncated {

    font-size: 30px;

    font-weight: 500;

    display: inline-block;

}

.ProfileCardMini-details .ProfileNameTruncated svg {

    fill: #fff;

    vertical-align: middle;

    max-height: 24px;

    width: 24px;

    height: 24px;

    max-width: 24px;

}

.ProfileCardMini-details .ProfileCardMini-screenname {

    font-weight: bold;

}

.ProfileCardMini-details a {

    color: #fff;

}

.ProfileCardMini-details a:hover {

    text-decoration: underline;

}

.ProfileNav {

    text-align: center;

    margin-top: -3px;

    background-color: #fff;

    -moz-box-sizing: border-box;

    box-sizing: border-box;

    height: 60px;

    border: 1px solid #e0e0e0;

    border-top: 0;

    border-radius: 0 0 4px 4px;

    overflow: hidden;

}

.ProfileNav ul {

    height: 60px;

    margin: 0;

    list-style: none;

}

.ProfileNav ul li {

    display: inline-block;

    height: 60px;

    line-height: 1;

    padding: 14px 15px 7px;

}

.ProfileNav ul li:first-child {

    border-bottom: 3px solid #ff5722;

}

.ProfileNav span {

    display: block;

    color: #707070;

    font-weight: bold;

}

.ProfileNav span.ProfileNav-label {

    font-size: 14px;

    letter-spacing: .02em;

}

.ProfileNav span.ProfileNav-value {

    font-size: 18px;

    padding-top: 3px;

}
Như vậy mình đã vừa hướng dẫn cách tạo banner Google+ kết hợp thống kê Blog đầu trang với phần 1 và 2 bắt buộc còn phần 3 thiết kế css thì bạn có thể thiết kế với sở thích của mình.
Chấm hết bài!!!

